A look at the benefits of, and common pitfalls in the yoga twists
This article first appeared in print in Australian Yoga LIFE magazine issue 31 in 2011, and is reproduced here with thanks to AYL.
Many traditional hatha yoga practices come from a belief that the abdominal organs are the key to good health. Twists more than any other group of postures apply the ‘squeeze and soak’ method (alternately squeezing the fluids out of the abdominal organs and then soaking them with fresh nutrients and oxygen rich blood as the twist is performed and released, on one side and then the other.) This squeezing and soaking also occurs to some extent in the intervertebral discs, which require this sort of movement to remain elastic, full of fluid and thus good at their job of providing space, cushioning and freedom of movement between the vertebrae of the spine. Twisting also mobilises intestinal blockages and promotes good digestion generally; if we twist first to the right, and then to the left, the intestinal tract is squeezed in such a way as to move it’s contents along in the correct direction to promote healthy elimination. One of the other great benefits of a pure twist is a release of tension in tissues (muscles, fascia and organs) along the mid-line of the body.
The mechanics of a twist
What do we mean by ‘a pure twist’? A perfect twist requires a smooth and even rotation of the spine around its axis, with no added flexion or extension (forward or backward bending) of the spine. It is this ‘corkscrewing’ action of the spine around its axis that creates a pure twist, and all of the benefits listed above.
The action of several muscles is involved in creating the corkscrewing of the spine that is the essence of a pure twist. Let us look at the mechanics of a twist, imagining that we are twisting to the right, and starting the twist from the lower spine, from either a standing, sitting or lying down position.
Internal and External Obliques-The belly
Located on the front and side of the body in the abdominal region, the external oblique muscles overlay the internal obliques. Both sets of muscles are arranged in fibres that run in distinct directions. The external obliques have two sets of fibres; the anterior (front) set originate at the middle side ribs and run diagonally down and inwards where they attach to the linea alba (a line of strong tendinous tissue that runs down the mid-line of the abdominal muscles.) The lateral (side) set originate from the lower side ribs and run straight down to attach to the top of the pelvis. The internal obliques begin at the front top of the pelvis and run diagonally inwards and upwards to the linea alba, where they attach. The internal and external obliques have a special relationship. Whilst if both the internal and external obliques on the same side of the body contract at the same time, a side bend is created, if the external oblique on one side, and the internal oblique on the other side of the body contract, the result will be a twist.
When a twist to the right begins, the right internal obliques and the left external obliques contract, and like wringing out washing, begin the corkscrew action of the spine.
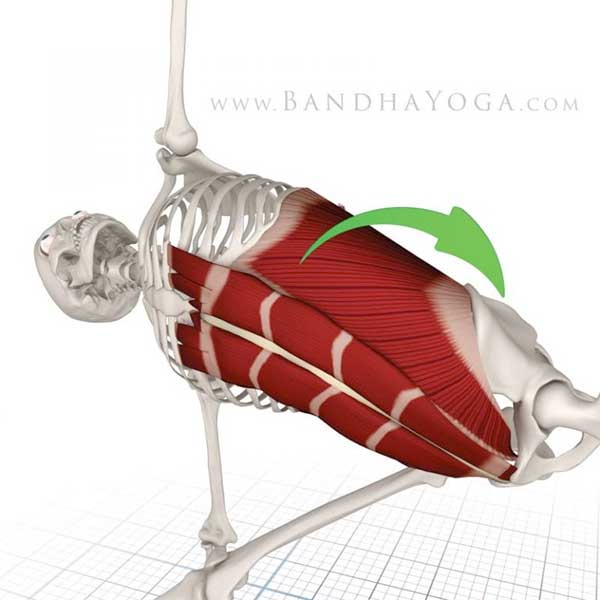
The upper-side internal oblique and the lower side external oblique contract in UtthitaTrikonasana, turning the trunk. Their opposites are lengthened by this action.
Rhomboids and Trapezius – The upper back
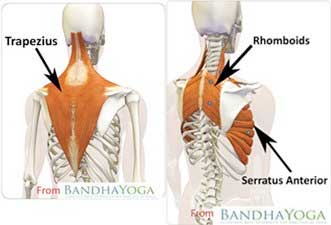
The rhomboids and trapezius are muscles on the back of the body that attach to the scapulae (shoulder blades) and the thoracic vertebrae of the spine. When these muscles contract, the scapulae are drawn in towards the spine and the thoracic vertebrae are pulled into rotation, deepening the twist.
Serratus Anterior-The side, connecting the front and back
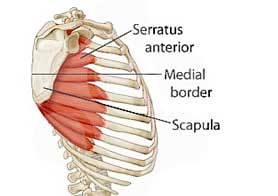
The serratus anterior muscles complete the twist by connecting the rotational action of the muscles on the front and back of the body, and the lower and upper parts of the spine. These muscles begin at the inner edge of the scapulae, and are connected by connective tissue to the rhomboids and trapezius. They then run around the outside edge of the ribs under the arm-pit, and attach to the front ribs. The Serratus anterior also interweaves with the external oblique, completing the bridge between the front and back, upper and lower parts of the twist. In a twist to the right, the left serratus anterior will contract, drawing the left ribs around and down and completing the corkscrew action of the whole twist.
Common pitfalls
Overtwisting the neck
In reality, not much twist actually occurs in the lumbar spine. The shape of the curves of the spine, the shape and size of the vertebral bodies, and the angle of the facet joints in the lumbar spine means that it has the least rotational movement possible, followed by the thoracic spine. The cervical spine allows the most rotational movement of all. In other words the neck is the easiest place from which to twist. This creates a tendency to over-use the neck in twists, and even to initiate the movement from the neck first. When the head turns first, the eyes can see the direction in which we are twisting…and we can often fool ourselves into thinking that we are therefore fully in the twist, when in fact the ONLY part of the spine that is fully twisting is the neck. Worse, when we can see the direction in which we want to go, it becomes more difficult to wait. If there is stiffness is the thoracic and lumbar region, and the body feels ‘stuck’, it becomes tempting to use leverage (perhaps using the arms) to pull ourselves deeper into the twist. This sort of leveraging generally does not deepen the twist in the rest of the spine, but instead destabilises the shoulder or hip girdle, and leads to possible strain in the neck.
Remedy
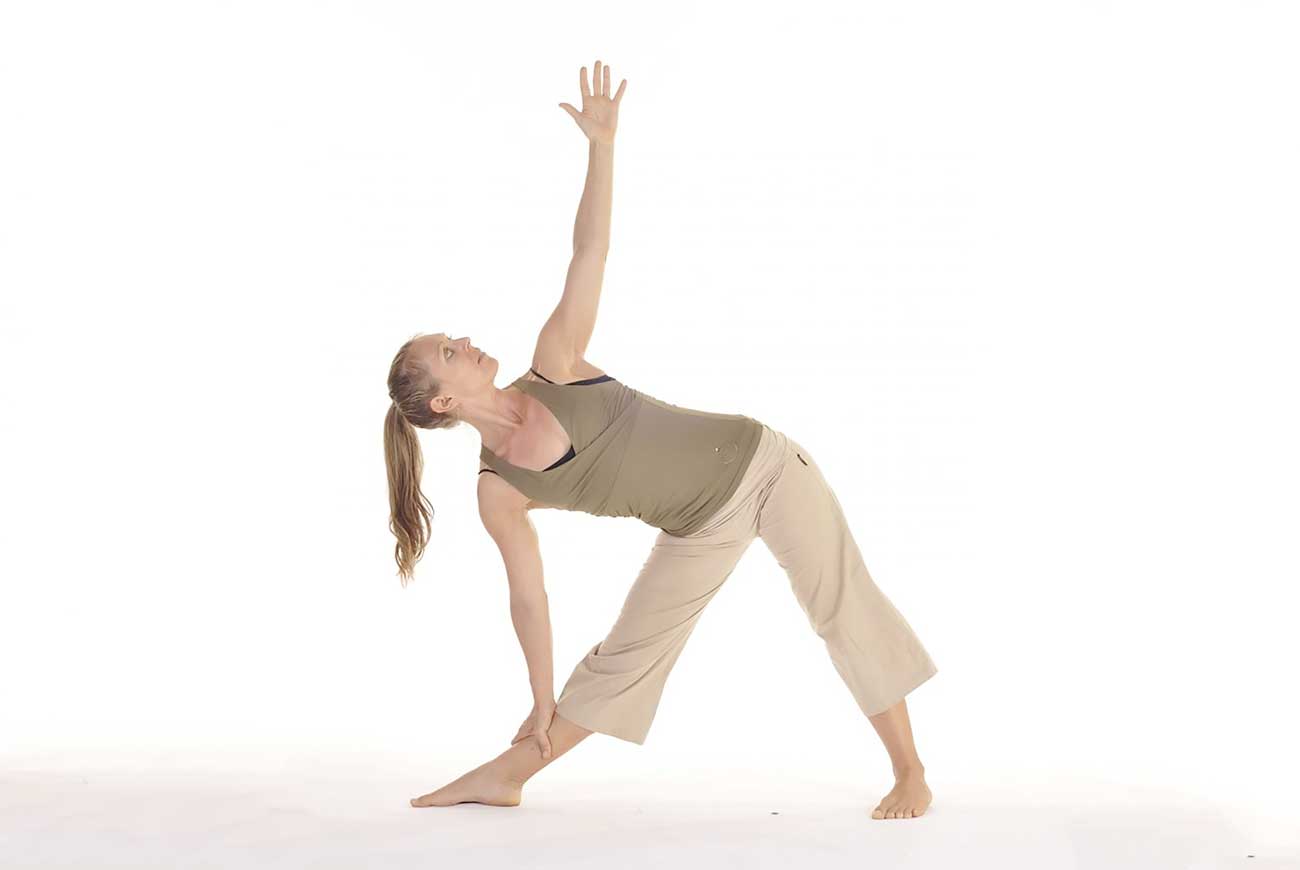
Think of beginning all twists from the belly. Let’s use Trikonasana, a standing twist, as an example.
Coming into Trikonasana right side, with the right leg in front, first stabilize the legs, pulling up on the thigh muscles and gently contracting the pelvic floor muscles. Inhale, take the arms out wide. Exhale as you extend out of the right waist, leading with the right arm and hand. As you extend to the right, allow the left hip to roll down and forwards, keeping the natural lumbar arch. Take the left hand to the left hip, and the right hand just above or just below the right knee. Have your chin tilted in towards the throat at this point…remember, the neck is going to move last!
Think of twist from the navel first. Inhale, and as you exhale, rotate the navel so that it starts to look up towards the ceiling. Inhale, and as you exhale, rotate the left chest towards the ceiling. Inhale, and as you exhale rotate the right chest so that it is level with the left. Only if both sides of the chest are evenly facing the wall in front of you, inhale and as you exhale turn the eye focus, and the chin, towards the ceiling. Inhale and raise the left arm, only if the neck is comfortable.
Try to feel that the twist is mostly in the belly, less in the chest, and least of all in the neck.
This method of twisting promotes the most even twist, and also protects the SIJ, pelvis and shoulder girdle joints from becoming destabilized and over stretched in the twist.
Avoid Over Twisting the Neck-Pics 1-5
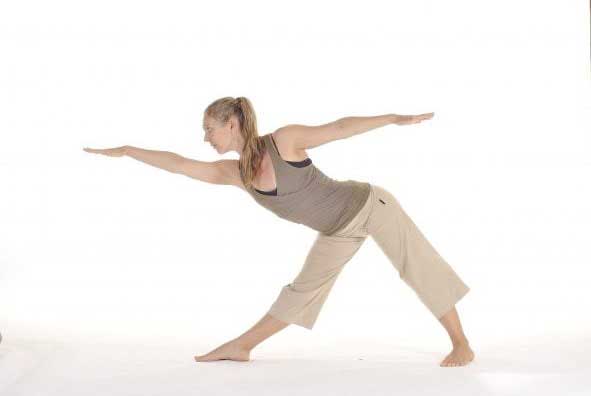
1. Lengthen to Right
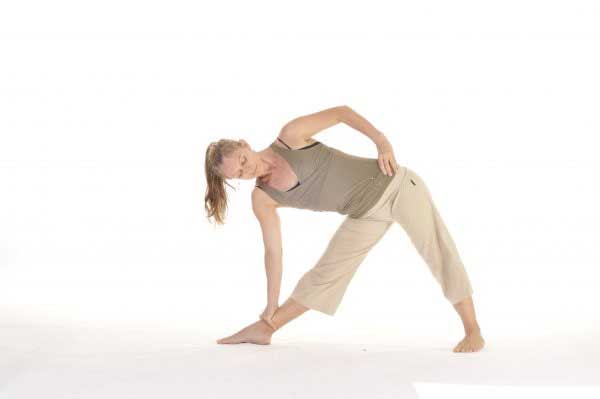
2. Twist from the navel first
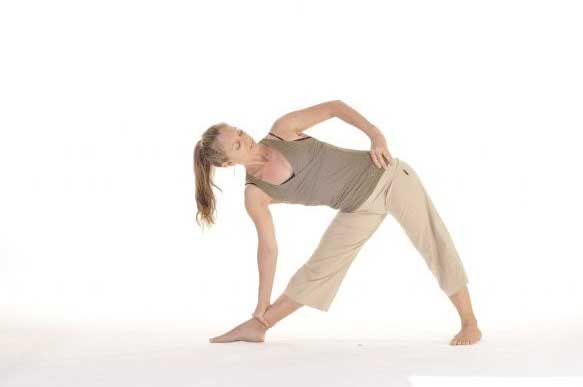
3. Take the twist into the thoracic spine
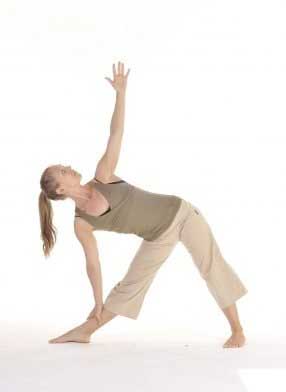
4. Turn eye gaze upwards if chest is open
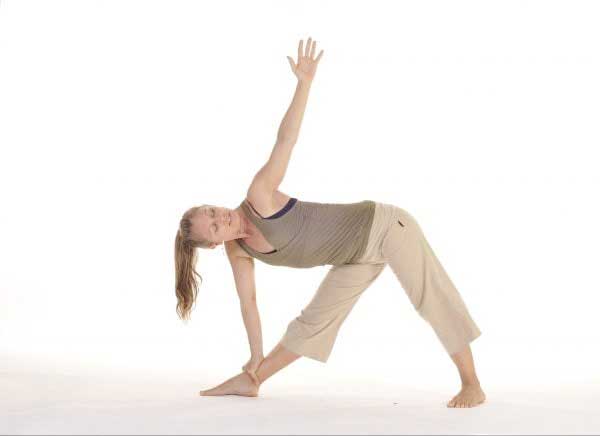
5. Incorrect. If the chest is turned to face the floor, turning the eye-focus to the ceiling or raising the arm will bring tension into the neck
Twisting with the lumbar spine in flexion.
We have already learned that in reality, not much rotation actually occurs in the lumbar spine. Move the lumbar spine into flexion (rounding the lower back) and there is no rotation possible there at all, resulting in an un-even twist that may strain muscles, overstretch joint ligaments, and compress the spinal vertebrae unevenly, leading to wear. To observe the impossibility of twisting from a rounded lower back, sit on the edge of a simple chair seat with the feet on the floor. Round the lower back, and then try to twist. Then return the centre. Lengthen upwards out of the lower back, so that the belly is long, and the natural arch of the lower back returns. Now try to twist again. Though it seems so much more difficult to twist with a rounded lower back, many of us practice seated twists in this way! The reason is usually tightness in the hamstrings and lower back muscles that make it impossible to sit upright with the legs outstretched on the floor…the starting posture for most seated twists.
Remedy
To remedy the tendency of the lower back to round, simply sit the buttocks onto a higher surface (two or three folded blankets, some firm cushions or a bolster) making sure that the height of your ‘seat’ is sufficient to prevent the back from rounding before you attempt the twist. Think of lengthening the lower spine in an upward direction as you inhale, and as you exhale create the twist.
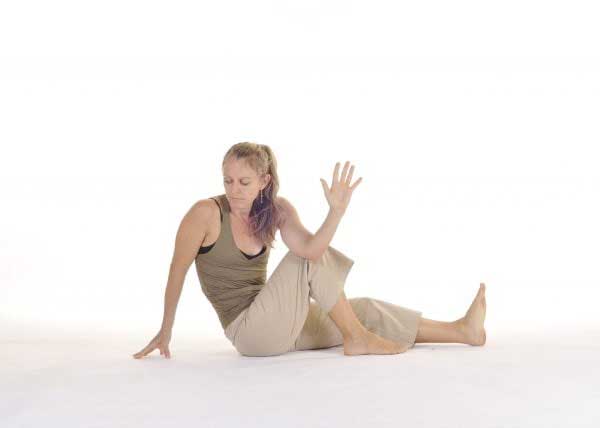
6. Maricyasana C incorrect
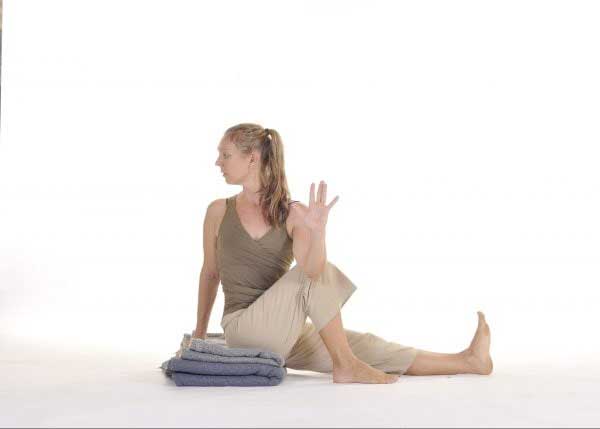
7. Maricyasana C correct
Moving the pelvis and the sacrum apart
In seated twists, where one leg is extended straight out along the floor, and the other knee is bent in some way (for example Marichyasana C, or Marichy’s pose) many of us are used to practicing with both sitting bones firmly planted on the floor, and the pelvis absolutely level. If you think about it, if we twist in this way, the twist begins at the waist. As we have learned, not much rotation happens in the lumbar spine, so the rotation will have to happen across the back of the hips…in other words, at the sacro iliac joint (SIJ). Twisting in this way means that the sacrum and the ilia (the two bones of the SIJ) are pulled in opposite directions. This creates torque through the joint itself, stretching the ligaments involved, and eventually de-stabilizing the joint (especially in women, whose SIJ tends to be less stable already.)
NB: Opinion is divided on this point of practice, as in many others, and many teachers will instruct you to perform twists with the hips planted, and the actual movement of the twist beginning at the waist. What I write here is what I believe to be the most beneficial way of practicing for most people, based on my own experience, and that of my teachers.
Remedy
When coming into a seated twist such as Marichyasana C (Marichy’s pose), with one leg straight and the other bent in some way, move the straight leg forward a few inches before the twist is begun. The hip socket of the straight leg should be a good 4-6 inches further forwards than that on the bent knee side. This will mean the there is a slope at the back of the hips. This action will ensure that the twist begins with the whole pelvis, and that the pelvis and the spine move together into the twist, preventing any torque through the SIJ.
Then take this principal into all twists, including standing twists such as Parivrtta Trikonansana (Twisted Triangle pose). Let the twist begin at the pelvis; let the pelvis slope at the back, (higher on the front leg and lower on the back leg side.)
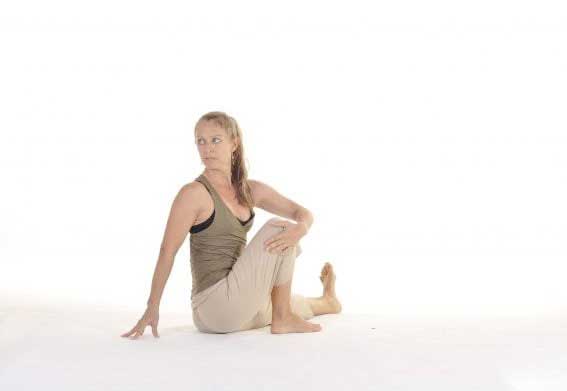
8. Maricyasana C-let the hips move with the twist
Safe practice principles
- Begin twists from the belly, keeping the belly open, then move into the thoracic spine, and twist neck last.
- Think of an even twist through the whole spine, with no one part twisting more than another. If anything, the lower spine should twist slightly more, with the degree of twist gradually decreasing towards the top, at the neck, which should rotate the least.
- Keep the lumbar spine long at the front; don’t let the lumbar spine move into flexion
- In seated twists, don’t plant the sitting bones; move the buttock on the straight knee side forward, so that the whole of the pelvis is moving with the twist.
References:
Anatomy and Asana: Preventing Yoga Injuries-Susi Hately Aldous, 2006 Eastland Press
Yoga Body-Judith Hanson Lasseter, PH.D, P.T.2009 Rodmell Press
Key Muscles of Yoga-Ray Long, Bandha Yoga
