

Stability and Strength
In ‘Yoga and the Shoulder Joint Part 1’, (that first appeared in Australian Yoga LIFE issue 38) we looked at how to minimise strain to vulnerable shoulder muscles and tendons by first improving our posture (reversing a rounded shouldered and closed chest posture and working towards a mobile thoracic spine and an open chest) and secondly by improving shoulder mobility, (especially the external rotational ability of the shoulder, and particularly in raised arm positions such as Adho Mukha Svanasana, or Downward Facing Dog pose.)
In working towards full mobility of the shoulder joint, the first part of this series looked at very simple movements of the shoulder, which should practiced until they become easy. Only then can stronger rotator cuff stretching postures such as Garudasana (Eagle Pose) and Gomukhasana (Cow’s Face pose) arm positions be safely worked towards, which then complete the shoulder?s full range of movements.
But what about shoulder and upper body strength? How does this component of shoulder functionality fit into the picture? Unlike many other physical regimes, yoga not only improves flexibility and ROM, but also helps build upper body (and shoulder) strength, with many yoga styles including repetitive weight bearing on the upper limb.
Unfortunately, many practitioners of yoga today injure their shoulder joint practicing just these weight bearing postures that should lead to increased strength and shoulder stability. Why?
Vinyasa Krama
(Intelligent Steps)
Just as is true for all yoga practices, we need to follow clear steps to achieve full functionality of the joint (Vinyasa Krama= Intelligent steps). To safely ask the shoulders to perform strong weight bearing techniques, we need to have FIRST attained a pre-requisite level of shoulder mobility. (This depends not only on the flexibility of the shoulder joint itself, remember, but also on the overall posture – an open chest and mobile thoracic spine being the ideal.-See part 1, issue 38.) We then need to work in a step-wise manner on joint stability – starting with simple stabilization techniques and only gradually moving on from there. If some of these steps are missed out, or if we try to progress too quickly, instead of these weight bearing practices being beneficial, they often lead to strain.
As we have seen in Part 1, the shoulder joint is a rather shallow ball and socket joint designed for maximum mobility. To allow this huge ROM (range of motion) the stability of the joint is partly compromised. The shoulder joint is really only made stable by the rotator cuff muscles and their tendons which surround and enclose the joint, rather than having a firmly fitting interlock of the bones (as is the case in the much deeper ball and socket of the hip joint, for example.) Another anatomical feature important in providing joint stability is the shoulder blade or scapula. To stabilise the joint, especially during weight bearing movements of the arm and shoulder, the scapula needs to be held in position close to the joint by muscles. In yoga students who do a lot of weight bearing on the upper limb, (as in Adho Mukha Svanasana/Downward Facing Dog pose and Chatturanga Dandasana/ Four Limbed Staff Pose) the muscles specific to the action of holding the shoulder blades in this stabilising position need to be especially active. If not, the scapulae will ‘wing’ (come away from the back of the shoulder) during load bearing, which then leaves the rotator cuff muscles at risk and vulnerable to strain. Over time this often leads to instability and injury of the rotator cuff tendons and muscles.
Stabilising Muscles of the Shoulder Joint
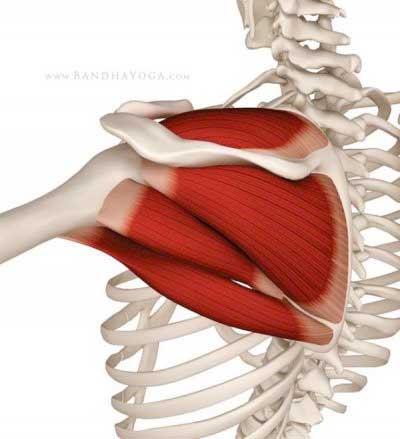
These muscles are the major stabilisers of the shoulder joint. They literally hold the humeral head (top of the arm bone) into the socket of the shoulder joint during movements of the arm, to prevent it from slipping out, or partially dislocating. (For a detailed description of the individual rotator cuff muscles and their role, please see ‘Yoga and The Shoulder Joint Part 1’.
How to Strengthen the Rotator Cuff Muscles
- First, remember that if you have had an injury, and one of the rotator cuff muscles has been partially torn or is irritated, whilst there is still pain and inflammation, the first stage is to REST with no weight bearing. (If you are not sure whether or not inflammation is there, it may be best to have an MRI.) This is the most important stage in rehabilitation of any shoulder injury, and the one which is most commonly skipped, leading to long term problems.
- Only once inflammation has subsided is it recommended to begin MOBILITY work (still with no weight bearing)-until full range of pain free movement is achieved. Also remember that before doing weight bearing work, as well as good all round shoulder mobility we would ideally have a mobile thoracic spine and open chest, -otherwise, the shoulder is not in a good position bio-mechanically to begin weight bearing (see Part 1 of this article, issue 38)
- IF the previous two steps of REST and MOBILITY with NO WEIGHT BEARING have been adhered to, we are ready to begin strength building and weight bearing work
- Gradual progression of stability work is the key. Begin with no or minimal weight bearing (see examples below) and gradually work toward bearing the weight of the whole body over a period of 3-6 months-certainly not straight away! Think of training the shoulder by using the wall rather than the floor for Chaturanga Dandasana (Four Limbed Staff Pose) and Downward Dog variations (see below) and later progressing to having the knees on the floor to modify practices such as Plank Pose and Chaturanga Dandasana from there.
- In this article, as in the previous one, we will look at some ideas for practicing in the very beginning stages of shoulder stability work that are often missed.
Jathara Parivartanasana Variation
This is a really good way to begin ?switching on? awareness of the rotator cuff muscles with very little danger of straining them.
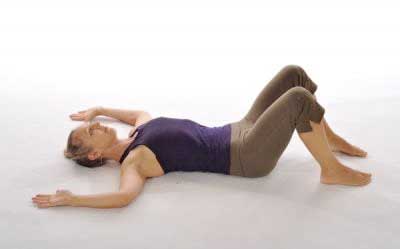
1. Jathara Parivartanasana Variation – Stage 1
STAGE 1.
Lie on the back with arms out to the sides and elbows bent as shown (cactus arms).
(NOTE: if your hands or even forearms do not easily touch the floor in the cactus arm position, please modify by taking the arms out at shoulder height, palms upwards, and gradually progressing toward the cactus arm position in small stages over a period of months.)
Bend the knees and place the feet on the floor.
On the inhalation, imagine that you are expanding the space between the shoulder blades into the floor. On the exhalation, gently draw the lower belly inwards and upwards. Stay with this for a few rounds of slow conscious breaths.
Now begin to also actively press the elbows and upper arm bones down into the floor. Allow the chest to open and the shoulder blades to flatten onto the back ribs and into the floor. Keep breathing into the space between the shoulder blades so that it expands into the floor.
You may be best to practice only this first stage for a few months, especially if there has been injury, and/or the actions required are not easy.

2. Jathara Parivartanasana variation – Stage 2
STAGE 2.
Keep the arms pressing into the floor.
On an exhalation, lift the knees and feet from the floor. Inhale and as you exhale slowly move the knees over to the right. Gradually allow the right thigh, right knee, and right ankle if you can to rest on the floor. (Don?t worry about what the other leg does.) Keep the left shoulder and upper arm pressed to the floor.??Keep breathing into the space between the shoulder blades and pressing the upper arms into the floor.
Stay for 10 breaths here. Then bring the knees back to the centre and move the knees to the left and repeat for the left side.
Practice 3-6 times a week for at least a month if there has been injury before moving into the weight bearing practices that follow.
3. Sirsasana Preparation using the wall
PROGRESSION
Once this practice can be performed with relative ease, it is safe to begin weight bearing postures to strengthen the rotator cuff. Think of starting in hands and knees postures such as cat pose variations (see ?Shoulder Cat? below) and then progressing to practices such as Half Dog with the hands to wall, and only later into full Downward Dog, and Downward Dog into plank variations (using a wall or a chair is a good first stage). Ask your yoga teacher/therapist to show you these if suitable and /or have a private session with a yoga therapist.
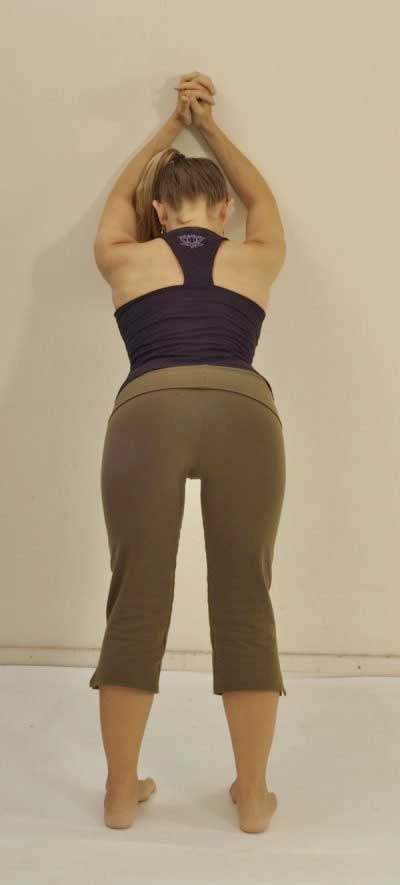
HEADSTAND PREPARATION USING A WALL
This practice is included here as it is an important posture in learning to recruit subscapularis, a rotator cuff muscle which is oft underused, and therefore reduce supraspinatus irritation.
Clasp the hands and place the elbows on the wall in a triangular position. The elbows should be no wider than shoulder width apart, and should be at shoulder height. Carefully begin to step the feet back and allow the tailbone to also move back so that you achieve a small forward bend at the hips. Let the head slip between the upper arms and relax the neck. Allow your weight to lean into the forearms so that the shoulder tops move away from the ears.
From there you can progress to ?Elbow Dog? (Sometimes called ?Dolphin Pose) and then headstand preparation with the feet on the wall (again ask your yoga teacher or therapist to teach you these.) Note; there is no weight on the head in any of these postures – THE HEAD DOES NOT TOUCH THE WALL OR FLOOR at the start of the pose, though it may lightly touch after a while in the pose.
2. Serratus Anterior
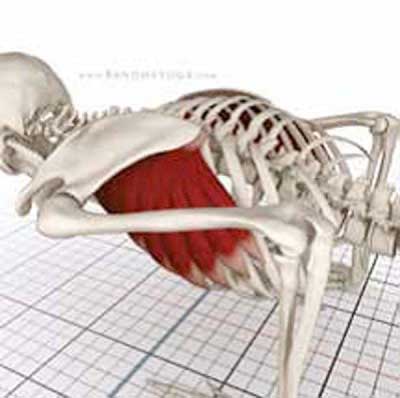
Serratus Anterior is an important shoulder stabilising muscle in weight bearing poses.
This is an important shoulder stabilising muscle, especially in yoga practitioners. However it is often weak and underused. Contraction of this muscle stabilises the scapulae preventing the inner edges ‘winging’ in pushing movements with weight on the hands, such as Chaturanga. If this muscle is weak, the scapulae will lift off the back, leaving the shoulder joint vulnerable to strain.
2. Strengthening Serratus Anterior

Scapulae winging in Chaturanga Dandasana – Incorrect
If the scapulae wing (the inner edges lift away from the back) as shown in weight bearing postures such as Chaturanga Dandasana, (or even in Downward Dog if very weak) the shoulder joint is prone to wear and tear and possible injury. Re-training yourself to work in weight bearing postures whilst engaging serratus anterior takes time and patience. It is best to have a teacher or friend to check that your scapulae are not winging to begin with, until you get the feeling for it yourself. As usual, start with minimal weight bearing whilst you get the feeling for engaging serratus anterior, before moving on to stronger weight bearing postures.
Shoulder Cat
i). Come onto all fours. In the start position, make sure that you are ?lifting out of the shoulders? (as in Pic 7) and not slouching into the shoulders (as in Pic 6.) Take a few slow conscious breaths here, taking your awareness to the place between the shoulder blades and the shoulder blades themselves.

Shoulder Cat Start Position – Incorrect

Shoulder Cat Start Position – Correct
ii). Take a conscious inhalation. On the exhalation, think of lifting the space between the shoulder blades higher towards the ceiling. Let the head hang. Feel the shoulder blades get wider apart through the movement, until they are right on the outer edges of the rib-cage at the end of the out breath.
On the inhalation return to the start position.

Shoulder Cat – Position 2
Shoulder Cat – Raise one arm
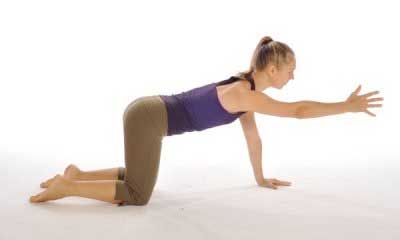
After a month or so of regular practice of shoulder cat, try coming into the start position (pic 7) and then slowly on an exhalation, raise one arm forward as shown. Have a friend check that you are still lifting out of the supporting shoulder and that the shoulder blade on the supporting side is not winging.
Chaturanga Dandasana (Four Limbed Staff Pose) using the wall
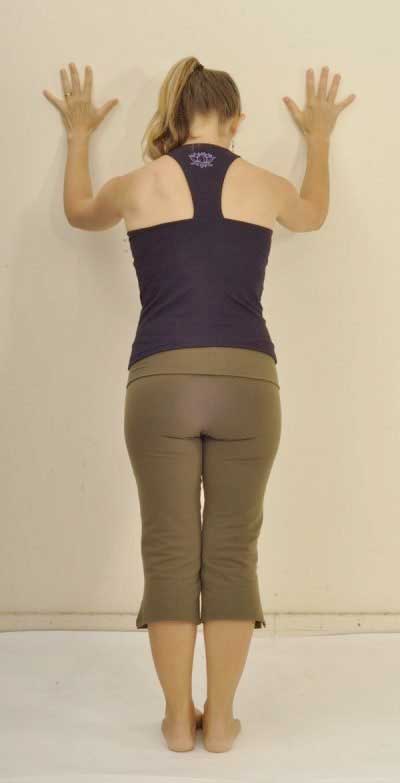
Stand at about arms-length from the wall with the palms on the wall at shoulder width and shoulder height. Try to ?push out? of the shoulders, and feel that the upper back spreads and that the shoulder blades are wide apart.
Take a smooth inhalation and on the exhalation slowly bend the elbows in and ?lean? the whole body towards the wall in a straight line so that the forehead is moving in the direction of the point between the thumbs. As you inhale, slowly push the wall away.
Make sure that the scapulae do not lift from the back at any point during the movement. Try to keep the upper back feeling slightly round, and get a friend to watch to begin with. Keep the elbows in.
Practice 5-10 rounds of Chaturanga Dandasana (Four Limbed Staff pose) to the wall 4-6 times a week as shown. Only when the practice becomes easy and there is a clear awareness of keeping the shoulder blades fixed to the back ribs, progress to Half Plank into Half Chaturanga Dandasana using the same principals.
References
The Key Muscles of Hatha Yoga-Ray Long MD, FRCSC, 2006 Bandha Yoga.
With thanks to Tamara James of Yoga Physio for her help on this and the previous article.