

A Practice for Life
This article was originally part 3 of a 3 part series on Developing a Personal Practice first published in Australian Yoga Life Magazine issues 11-13, way back in 2004-2005, and is reproduced in an edited form here by kind permission of AYL.
Those who come to my Suffolk Park Hall classes will be familiar with this sequence. If you would like to work on these postures at home-here’s how!
With the addition of the ‘Flo Fenton?s Sun Salutes’ practice and the standing postures that appear in the ‘Asanas for Health and Energy’ post, you would have a very balanced and complete, strength and energy building practice! See the text at the end of the Vinyasa for the original text that appeared in AYL issue 13, Nov 2005-March 2006.
Focus Categories; Core-strength, Backbends, and Inversions-Benefits
Increasing our core-strength (strengthening the deep supporting muscles of the pelvic floor, abdominals and lower-back) not only keeps the lower back strong and free of injury on a physical level, but builds a sense of personal power and strength on an energetic level.
The backbends work strongly to open the chest area, strengthening the heart and lungs, and by stretching the abdomen they improve digestion and elimination. On an energetic level, the backbends build courage and re-energise. They open our front surface (that part with which we engage with the world) thereby increasing our ability to meet with others, with challenges, and with the outside world generally.
Inversions send more blood flow to the brain, heart and lungs, increasing the supply of oxygen and nutrients to the control centres of the brain which govern metabolism and all of the body’s major systems. On an energetic level, they turn our perceptions upside-down, giving us a new way of looking at the world, thus increasing adaptability and open-mindedness.
1. Abdominal Breathing

Focus on the natural breath for a few minutes. Then consciously start to smooth out and slow down the breath. Place the right hand on the abdomen, and the left hand on the heart. On the in breath feel the upper abdomen lift and stretch. On the out breath feel the lower belly draw in and up. Let the belly be soft and mobile. Breathe in this way for 5-10 minutes.
2. Pelvic Rocking
Lie down on your back with your feet hip width apart and the outside edges of the feet parallel. Become aware of the movements created by the breath at the back of your waist and pelvis. Inhale, and as you exhale strongly press the back of the hips downwards into the floor, and draw the abdomen in towards the spine. As you inhale, just relax and feel the lower back naturally deepen its hollow. Once you are used to this feeling, add in drawing the pelvic floor in and up on the out breath as well.
Repeat with all three muscles actions five times.
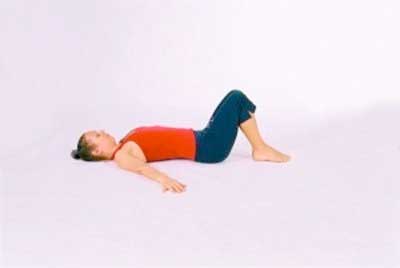
3. Abdominal Strength Building-Single Leg Raises
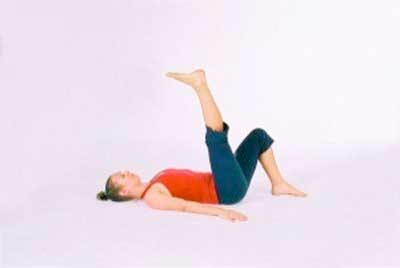
Exhale as you lower the right leg slowly toward the floor, drawing the abdomen in, pressing downward through the back of the pelvis, and squeezing the pelvic floor at the same time.
As you inhale slowly raise the leg again. Try to co-ordinate a long slow breath with a smooth, and steady movement. The more you can keep your pelvis still, the more stabilising work the deep supporting muscles are having to do.
Repeat this 5 times for the right leg and then change sides, and do the same number with the left leg.
(If you notice that your lower back wants to deepen its arch, or if there is any strain whilst performing the straight single leg raise shown above, then modify by bending the knee of the working leg as shown.)
4. Lower Back Strength-Half Locust Pose
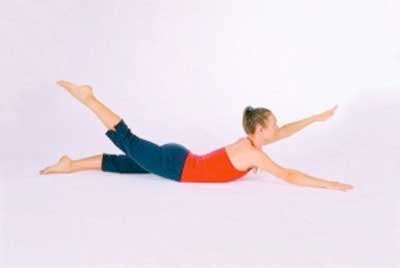
Lie down on your front with arms stretched forward along the floor. Stretch to lengthen the distance between your finger-tips and your toes. Inhale, hold the breath in and lift the right arm and the left leg, and the chest. When you are ready to exhale, come down. Then inhale, hold the breath in and raise the left arm and the right leg, and chest. Exhale to come down.
This is one round. Practice 5-6 rounds then rest completely with the arms down by the sides and the head turned to one side. Close the eyes.
5. Backbend Series-Setu Bandha or Bridge Pose Vinyasa
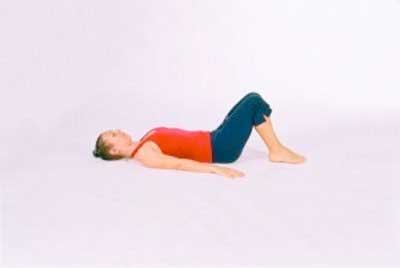
a. Lie on your back, knees bent, feet just over hip-width apart and parallel, and hands on the floor beside the hips. Make sure your knees are not knocking in or splaying out. All the toes must stay firmly on the floor, and the knees parallel, throughout the next series of movements.
b. Inhale as you raise the arms and the hips simultaneously. Exhale as you lower the arms and hips simultaneously. Don’t try to tuck the tail under-left the lower back maintain its natural arch.
Repeat this 5 times.
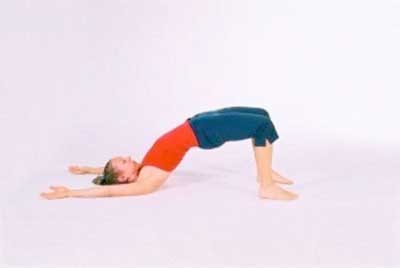
6. Setu Bandha/Bridge Pose
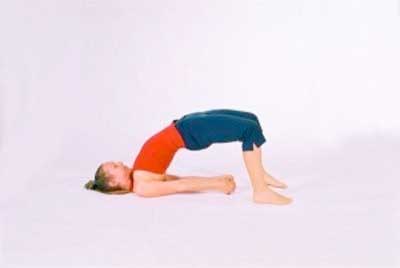

a. Take the hands down on the last round and see if you can clasp the hands with the arms straight. (If not just place the palms down on the floor with the arms straight). Press the feet firmly into the floor. As you inhale see the chest expand and lift towards the chin. As you exhale draw the belly smoothly in towards the spine.
Stay for 5-10 breaths if comfortable and then come down, OR;
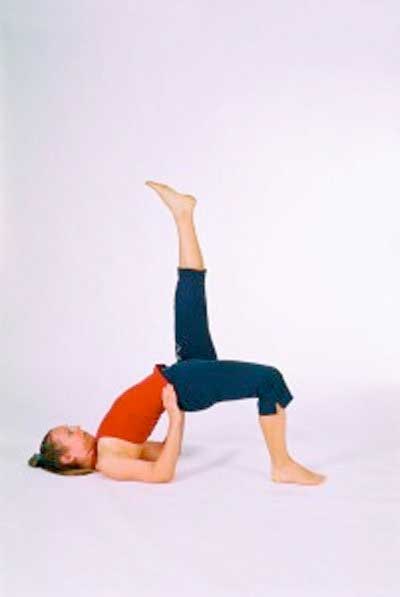
b. If the pelvis is high enough, there will be space for the forearms to be vertical so that you can support the hips in the hands. If this is comfortable, inhale as you raise the right leg to upright. Stay for five long breaths. Then exhale bring the right leg back down and repeat for the left.
Come down to rest.
7. Urdvha Dhanuarasana-Upward Bow Pose
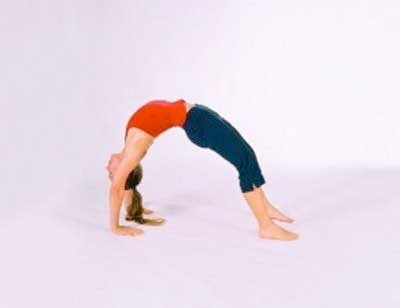
Slip the hands under the shoulders, palms down. Make sure that the elbows are pointing straight upwards, not out to the sides. Inhale, and as you exhale push the floor away, lift the hips and straighten the arms. Make sure the feet don’t turn out! If they do, take them as wide as you need to so that you can bring the outside edges of the feet to parallel.
Stay here for 5-10 long slow breaths if comfortable.
To come down, lift the chin to the chest as you inhale, and exhale lower yourself down with the back of the head and neck on the floor.
8. Upper back over a rolled blanket
![]()
Place a tightly rolled blanket on the floor about level with the lower tips of the shoulder blades. Have enough folded blankets under the head to keep the neck level at the back. Have the knees bent and feet on the floor. The whole of the back of the shoulder blades should be comfortably on the floor. If not the roll is too thick for you.
Stay here for 5 minutes or so, with smooth, long breathing. Breathe into the upper abdomen. Breathe out drawing the lower belly in.
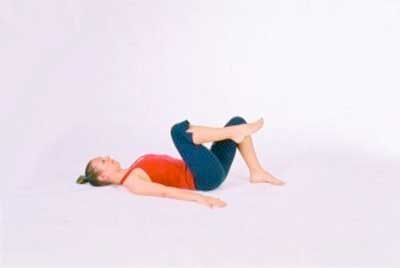
9. Counterpose – Apanasana

Place the palms of the hands on the knee caps, fingers pointing down towards the ankles and elbows straight as shown. Let the feet just flop. This is the starting position. Take a good in breath here.
As you exhale bend the elbows, drawing the thighs in towards the belly.
This is one round. Practice 5 rounds withing your comfortable range of movement.
10. Supine Twist
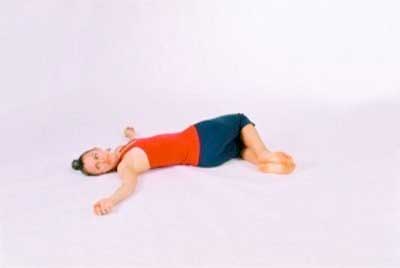
Start lying on the floor with the arms out at shoulder height. Place the feet and knees together. Inhale, and as you exhale take both knees and feet over to the right. Inhale as you return to the centre. Exhale as you take the knees and feet over to the left. Inhale back to centre.
This is one round. Practice three rounds.
From here, if you are menstruating or have neck issues, go straight to 15.
11. Shoulder Stand-Feet to the Wall
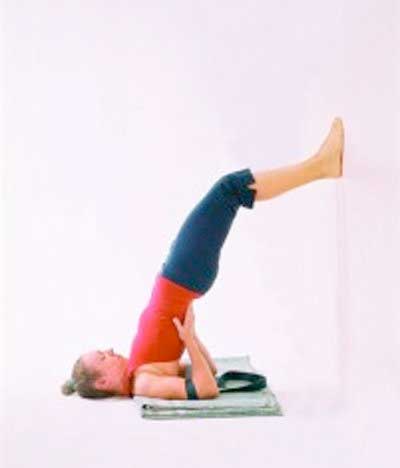
a. Use 2-4 blankets (more for those with a tight neck, less for those more flexible) placed about 2 feet from the wall, neatly folded, with the closed folded edges placed together, and facing away from the wall. The blanket size when folded needs to accommodate the width of the shoulders and the length of the forearms!
Lie down on the blankets so that your shoulder tops are about level with the neatly folded blanket edges. Your head and neck are OFF the blankets. Make sure that no part of the neck is on the blankets, as the edges will then dig into the neck. Your legs are STRAIGHT and up the wall at this point, with the whole back on the floor.
Have a looped belt ready in your right hand at the right width to hold your elbows at shoulder width apart or a little wider. Keep your elbows in close beside you and bend the elbows. Inhale and as you exhale lift the hips away from the floor, allowing the knees to bend naturally as you lift up, until you have your feet on the wall at kee height and the hips in line with the shoulders.
Now quickly take the belt over one elbow, then the other, and place the palms onto your back.
Place the feet together and the knees together, and work to keep the hips forward and in line with the shoulders. This will build the requisite strength to achieve full Shoulder Stand down the track. Stay for 25 breaths or until you need to come down. Take the belt off before you come down and return into legs up the wall.
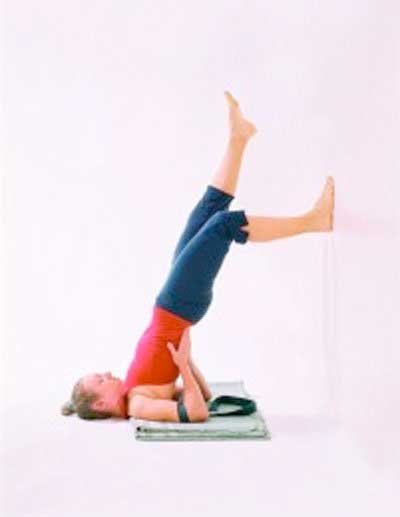
b. If you are still comfortable and steady in body, breath and mind after 20-25 breaths, then you can extend the one leg straight upwards for 10 breaths. Keep the hips in line with the shoulders. The replace that foot back onto the wall and repeat for the other side.
Then either remove the belt and roll down into legs up the wall, or proceed to 12.
12. Shoulder Stand – Salamba Sarvangasana


a. Either come into this pose form 11a by taking one foot off the wall and then the other. OR, you can come into it by setting up as for 11a but without the wall, then roll into Halasana (13) and place the belt on and come up into free-balance Shoulder Stand if able.
Keep the inside edges of the feet together.
Stay in the pose with relaxed breathing for a minute or two.
Only if you are comfortable and steady in body, breath and mind, proceed to 12b.
b. Inhale, and as you exhale slowly lower the right leg parallel to the floor. Hold it here at half way for a few breaths, and check that the knees are straight, the back is not rounding, and that there is no strain. If all these things are there then you can lower the foot closer to the floor.
Inhale raise the right leg. As you exhale lower the left leg parallel to the floor. Hold it here at half way for a few breaths, and check that the knees are straight, the back is not rounding, and that there is no strain. If all these things are there then you can lower the foot closer to the floor.
Inhale raise the left leg. Keep the feet together.
At this stage check in with yourself. If there is any strain, take off the belt and roll down and rest. Only do the next practice if you know you have both the strength and the flexibility to do so. Otherwise come down.
Inhale, and as you exhale lower both legs half way to the floor.
Hold the legs at half way for a few breaths if you can, keeping the lower back hollow, and the shoulders directly above the hips.
13. Plough Pose – Halasana

Inhale, and as you exhale lower the legs until the toes touch the floor. (If you get in trouble and any strain appears, bend the knees, and roll down.) Tuck the toes under and straighten the legs if you can.Walk the toes in towards the head until you can lift the sitting bones up and back so that the lower back straightens. Extend the arms back behind you and interlace the fingers.
Stay with an easy, free breath for as long as is comfortable.
To come down, if you are by the wall, lift one leg and then the other back to upright, so that you are back in Shoulder Stand. Then bend one knee and place that foot onto the wall, then the other. Then roll down into legs up the wall. Stay here for a minute or so.
If you came up without the wall, you can just take the arms back down onto the mat beside you and roll down the spine to lying on your back. Bend the knees and rest here for a few minutes.
14. Fish Pose – Matsyasana

Start lying down on your back with knees bent and arms down by your sides (as in position 5a.)
Lift the hips and take your arms underneath your back, palms down. Lie back down on top of the arms with the backs of the hands beneath the buttocks. Try to work the arms in close together under the back so that the thumbs are touching. Extend the legs out straight, with the feet together. Dorsi-flex the feet as shown and keep then dorsi-flexed until you come down to rest.
Keeping the chin tucked into the throat, take a good breath and left the chest so that you are resting on your elbows and looking at your toes. Try to expand the chest forwards so that the shoulders are in line with the elbows. If this is not possible, come down and rest.
If you are comfortable here, take a good in breath as you lift the chin, so that you are looking at the ceiling. If you are still comfortable, exhale and lower the head gently back as shown. Gaze into the eyebrow centre. Stay for 5 breaths or as long as is comfortable.
To come down, first lift the chin, looking at the toes. Then bend the knees and roll down onto your back, knees together and feet wide. Rest the palms on the belly and close the eyes.
15. Legs up the Wall – Viparita Karani

Place a three-fold (concertina folded) blanket a couple of feet from the wall. Come into the pose by standing beside the mat, bending the knees with your BACK facing the wall, and rolling onto your side, and then onto your back, lifting the legs as you go. The blanket should be behind the pelvis, with the top edge level with the top of the pelvis and no higher. The lower back and the legs should be relaxed. if the knees are bending or the back rounding, move away from the wall some more, bringing the blanket with you. Rest the backs of the heels on the wall, and close the eyes. Take the arms out to a comfortable position that does not distort the neck.
Stay in the pose for 10 minutes.
16. Relaxation – Savasana
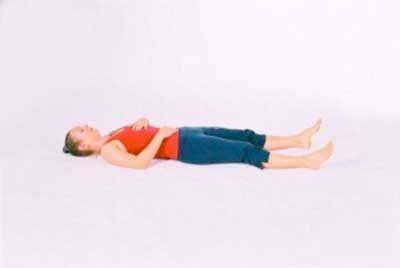
Lie down with closed eyes in a simple relaxed posture for 5-10 minutes.
A Practice for Life
FROM AUSTRALIAN YOGA LIFE – Issue 14
In last issue, we looked at ?Overcoming Obstacles? in the pursuit of attaining and maintaining a home practice. In this, the final in our series of three articles on the subject of creating a home practice, let us focus on sustainability and flexibility in the way in which we approach our practice.
As we go on in life, things change. Sometimes the changes which may at first appear to be counter productive to where we feel our life should be leading, in-fact turn out to be the changes that have most profoundly affected the direction of our lives for the better. So it is in our yoga practice. Sometimes we may feel we have been ‘set-back’ in our practice, either by injury or illness, or by circumstances which have made the maintenance of our practice more difficult. If we can develop an attitude of humility, acceptance and openness to these things, and find a way to work with them rather than fight against them, it may be that our yoga practice becomes the means by which we discover what the universe is trying to tell us!
I have a delicate and temperamental lower back myself. I am very cautious with it, and rarely try the extreme backbends and legs-behind-the-head poses that I used to in the past (which, guess what, always seemed to lead to an injury!) Even so, and no matter how much strength work I do, sometimes it gets injured doing just the normal things. I have come to take this as a sign to slow down, take on less work, and modify my practice so that the focus (in my practice, and in my life) is on re-consolidating, recuperating, and stabilising. Over the years, it has been in these periods of vulnerability that I have learned most about myself, and ultimately about how to work in a way that is sustainable in a yoga practice (and in life!). In the past I would become frustrated if I had to hold back from doing the strong poses that I was working on my back injuries were just in the way! Now my focus in my practice has become not in achieving these extreme poses, but in maintaining a strong and injury free back, at all costs! This shift in perception in the way that I approach my practice has a profound corresponding effect on the way in which I do my life. In the end, a yoga practice should support and enhance your life?not become the reason for living! In other words, one should do yoga to live, not live to do yoga!
I hope therefore that my current style of Asana practice is one which is sustainable for the rest of my life; but increasingly I see my Asana practice as a means to an end. As we progress in our practice, we will ultimately move through the limbs of yoga, so that the practice of yoga Asana also incorporates the limb of Pratyahara the ability to become a witness to oneself. As self awareness deepens, practice time becomes not a time where we bend the body into different shapes, and work toward the attainment of new, more advanced postures, but a time when we observe ourselves, breath by breath, on ever subtler layers. At first we gain a heightened awareness of the physical body in the postures (the differences, for example, of how the a-symmetrical poses feel on the left and on the right side), and gradually we move our awareness in deeper to the breath, to the energy body, to the state of mind. This progression from gross awareness to ever more subtle can only take place if we ‘soften’ our perception, if we are straining in a pose just to be there, it is unlikely that we will be able to feel anything other than strain and pain! If we take a step back and find a more sustainable version of the pose for us, we discover so much more.
The time that we spend in stillness (in Savasana, in meditation, and in recuperative postures) gradually becomes just as, and eventually more important than the time we devote to going through the Asanas. Relaxation becomes as valuable as being active; being becomes as important as doing. Ultimately, a practice should create change?and that change is not necessarily linear. Expect the unexpected..and like water, flow around the bumps!